
Importing a Kubernetes Cluster
This page explains how to import (connect) an existing Kubernetes cluster to Kuboard so that it can be browsed, operated and managed in Kuboard. Kuboard supports two import methods: kubeconfig (paste the cluster's kubeconfig file) and Token (apiServer address + access token).
Importing does not affect the cluster itself
Importing a Kubernetes cluster into Kuboard does not affect the cluster's independence. In other words, even if Kuboard is unavailable, the Kubernetes cluster keeps working normally. Kuboard only acts as a client application of Kubernetes that connects to the apiServer.
Where to Start
The entry point for importing a cluster is on the Cluster Management → Kubernetes Clusters page:
- After logging into Kuboard, click Cluster Management in the left navigation;
- Enter the Kubernetes Clusters list page (route
/cluster/clusters); - Click the Import Cluster button in the top-right corner to enter the import page (route
/cluster/clusters/create, page title "Import Kubernetes Cluster").
The cluster list page also shows an overview of every imported cluster, with the following columns:
| Column | Description |
|---|---|
| Cluster ID | The unique identifier (uid) of the cluster in Kuboard |
| Cluster Name | The name entered when importing |
| Description | The description entered when importing |
| Cluster Version | The version obtained from the apiServer's /version endpoint (status.k8sVersion.gitVersion) |
| Import Method | kubeconfig or token |
| Import Status | importing / success / failed |
| Cluster Status | ready / error / unknown; when the status is error, hover over it to see the reason for the connection loss and the check time |
| Import Time | The creation time of the cluster record |
Import Methods
Two tabs (radio buttons) at the top of the import page let you choose the import method: kubeconfig and token. Both methods share the following form fields:
| Field | Corresponding spec field | Description |
|---|---|---|
| Cluster Name | metadata.name | Required, 3 - 24 characters, must not duplicate an existing cluster name |
| Cluster Description | spec.description | Optional, used to tell clusters apart in the list |
| Time Zone | spec.timeZone | Optional, chosen with the timezone picker; if left empty, the default time zone configured on the Kuboard server is used |
The remaining fields (apiServer, certificate / Token, skip hostname verification, proxy address) differ slightly between the two methods, as described below.
Method 1: Import via kubeconfig
The kubeconfig method pastes the content of the /etc/kubernetes/admin.conf file from the cluster's control plane node, and Kuboard parses the apiServer address and client certificate from it. This method only supports kubeconfig files generated when a cluster is installed with kubeadm (clusters installed with tools such as TKE and kubespray also use kubeadm).
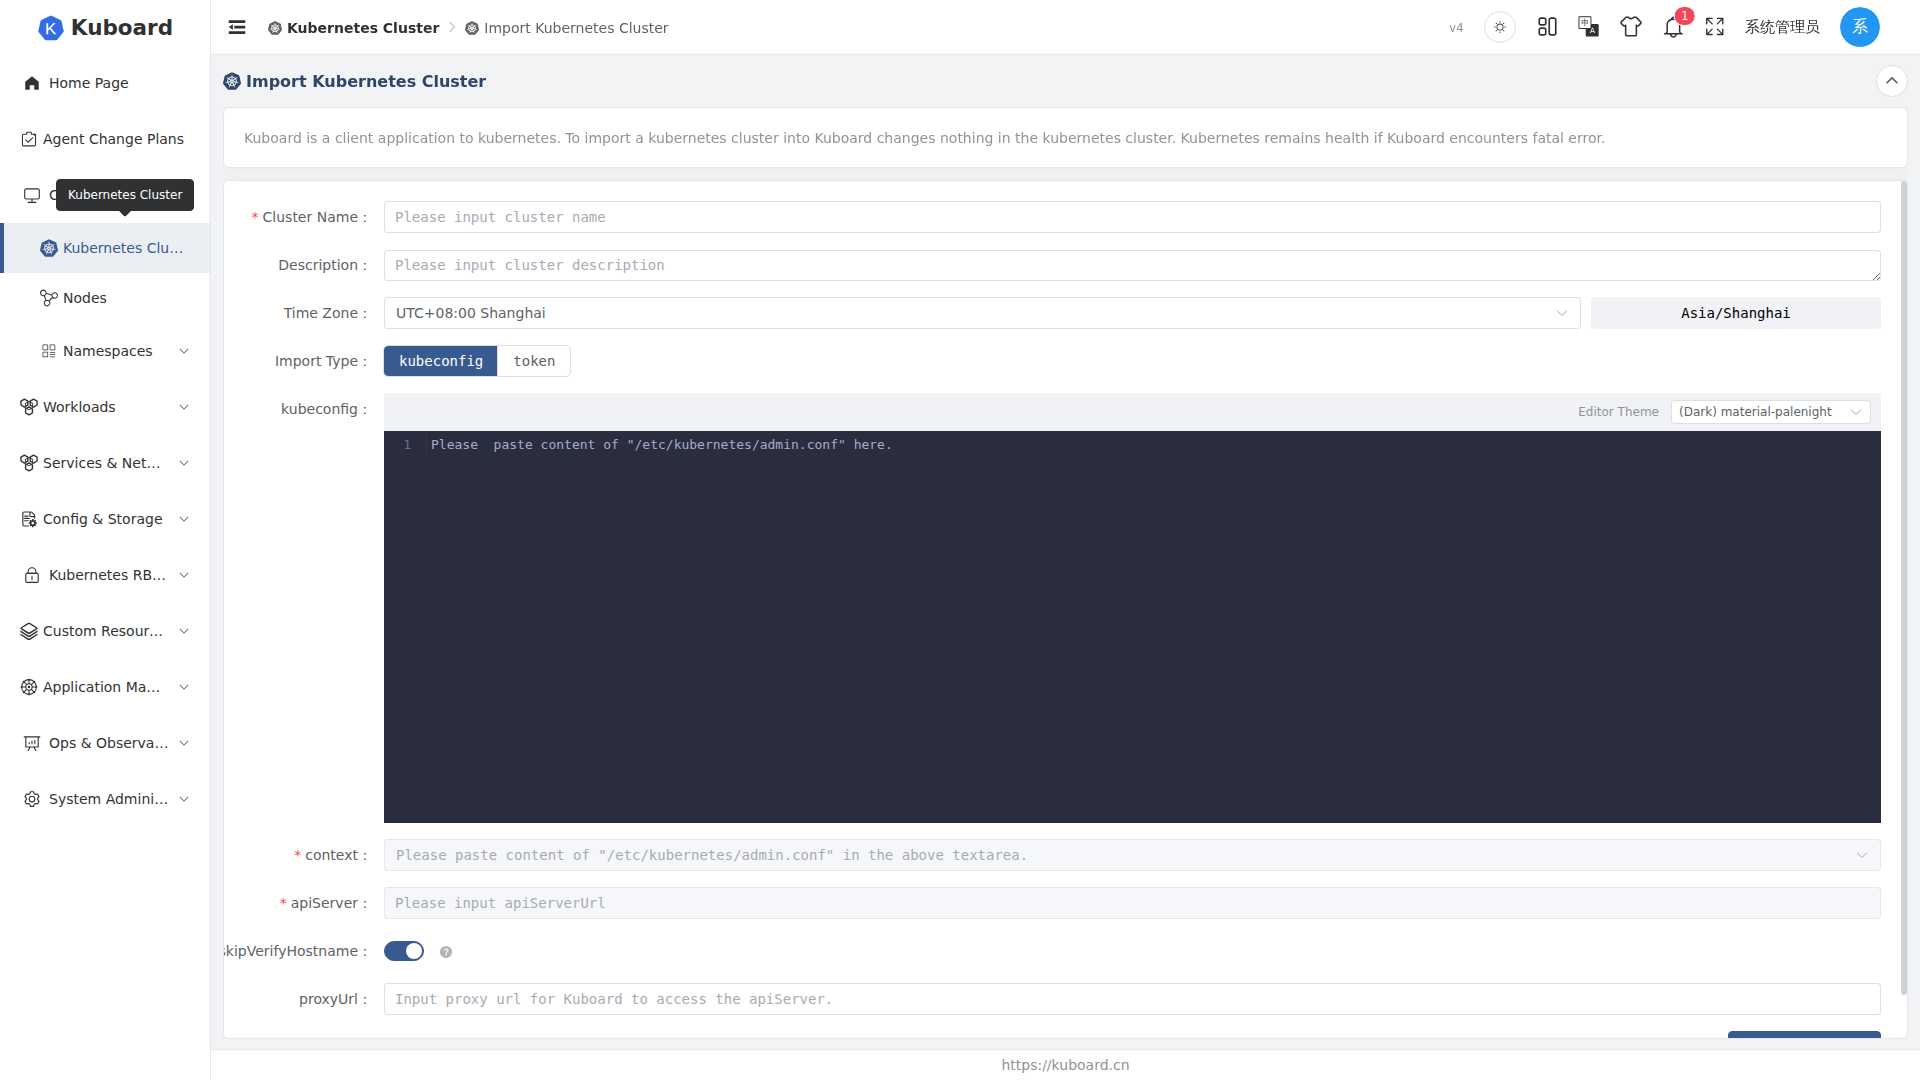
Run the following command on the cluster's control plane node to obtain the kubeconfig file content:
cat /etc/kubernetes/admin.confThe form fields for the kubeconfig method are as follows:
| Field | Description |
|---|---|
| kubeconfig | Code editor area; paste the complete content of /etc/kubernetes/admin.conf |
| context | Cluster context dropdown; after pasting the kubeconfig it is parsed and listed automatically; selecting one automatically fills in the apiServer address and certificate information |
| apiServer | The apiServer address; automatically filled with the server field of the selected context, can be edited manually |
| Skip Hostname Verification | Toggle; see "Connection Options" below |
| proxyUrl | Proxy address; see "Connection Options" below |
Kuboard validates the kubeconfig content right after you paste it:
- A YAML parse failure shows the message "Error parsing YAML";
- It must contain all three fields
clusters,contextsandusers; if any of them is missing, the message "Please make sure you copied the complete content of the kubeconfig file" is shown; - The context can only be selected after parsing succeeds.
Once a context is selected, Kuboard extracts certificate-authority-data, client-certificate-data and client-key-data from the cluster / user that the context points to (a token field on the user is also extracted if present), assembles them into certificate information and submits it to the server.
TIP
- Before a kubeconfig is pasted, the context dropdown is disabled and the placeholder reads "Please paste the content of the
/etc/kubernetes/admin.conffile in the code area above"; - After selecting a context you can modify the apiServer address manually, for example when switching between an intranet address and a public address;
- Paste the complete content; copying only part of the file (for example only the
userssection) will not pass validation.
Method 2: Import via Token
The Token method requires an apiServer address and an access token. The token is created by running a script on the control plane node of the target cluster. The script creates:
- the
kuboardNamespace; - the
kuboard-adminservice account (ServiceAccount); - the
kuboard-admin-crbrole binding (ClusterRoleBinding) that binds thecluster-admincluster role (ClusterRole); - the
kuboard-admin-tokentoken (Secret).
Run the following on the cluster's control plane node:
cat << EOF > kuboard-create-token.yaml
---
apiVersion: v1
kind: Namespace
metadata:
  name: kuboard

---
apiVersion: v1
kind: ServiceAccount
metadata:
  name: kuboard-admin
  namespace: kuboard

---
apiVersion: rbac.authorization.k8s.io/v1
kind: ClusterRoleBinding
metadata:
  name: kuboard-admin-crb
roleRef:
  apiGroup: rbac.authorization.k8s.io
  kind: ClusterRole
  name: cluster-admin
subjects:
- kind: ServiceAccount
  name: kuboard-admin
  namespace: kuboard

---
apiVersion: v1
kind: Secret
type: kubernetes.io/service-account-token
metadata:
  annotations:
    kubernetes.io/service-account.name: kuboard-admin
  name: kuboard-admin-token
  namespace: kuboard
EOF

kubectl apply -f kuboard-create-token.yaml
kubectl -n kuboard get secret $(kubectl -n kuboard get secret kuboard-admin-token | grep kuboard-admin-token | awk '{print $1}') -o go-template='{{.data.token}}' | base64 -d
The output of the last command is the token you need; fill it into the token field (required) on the Kuboard UI. The form fields for the Token method are as follows:
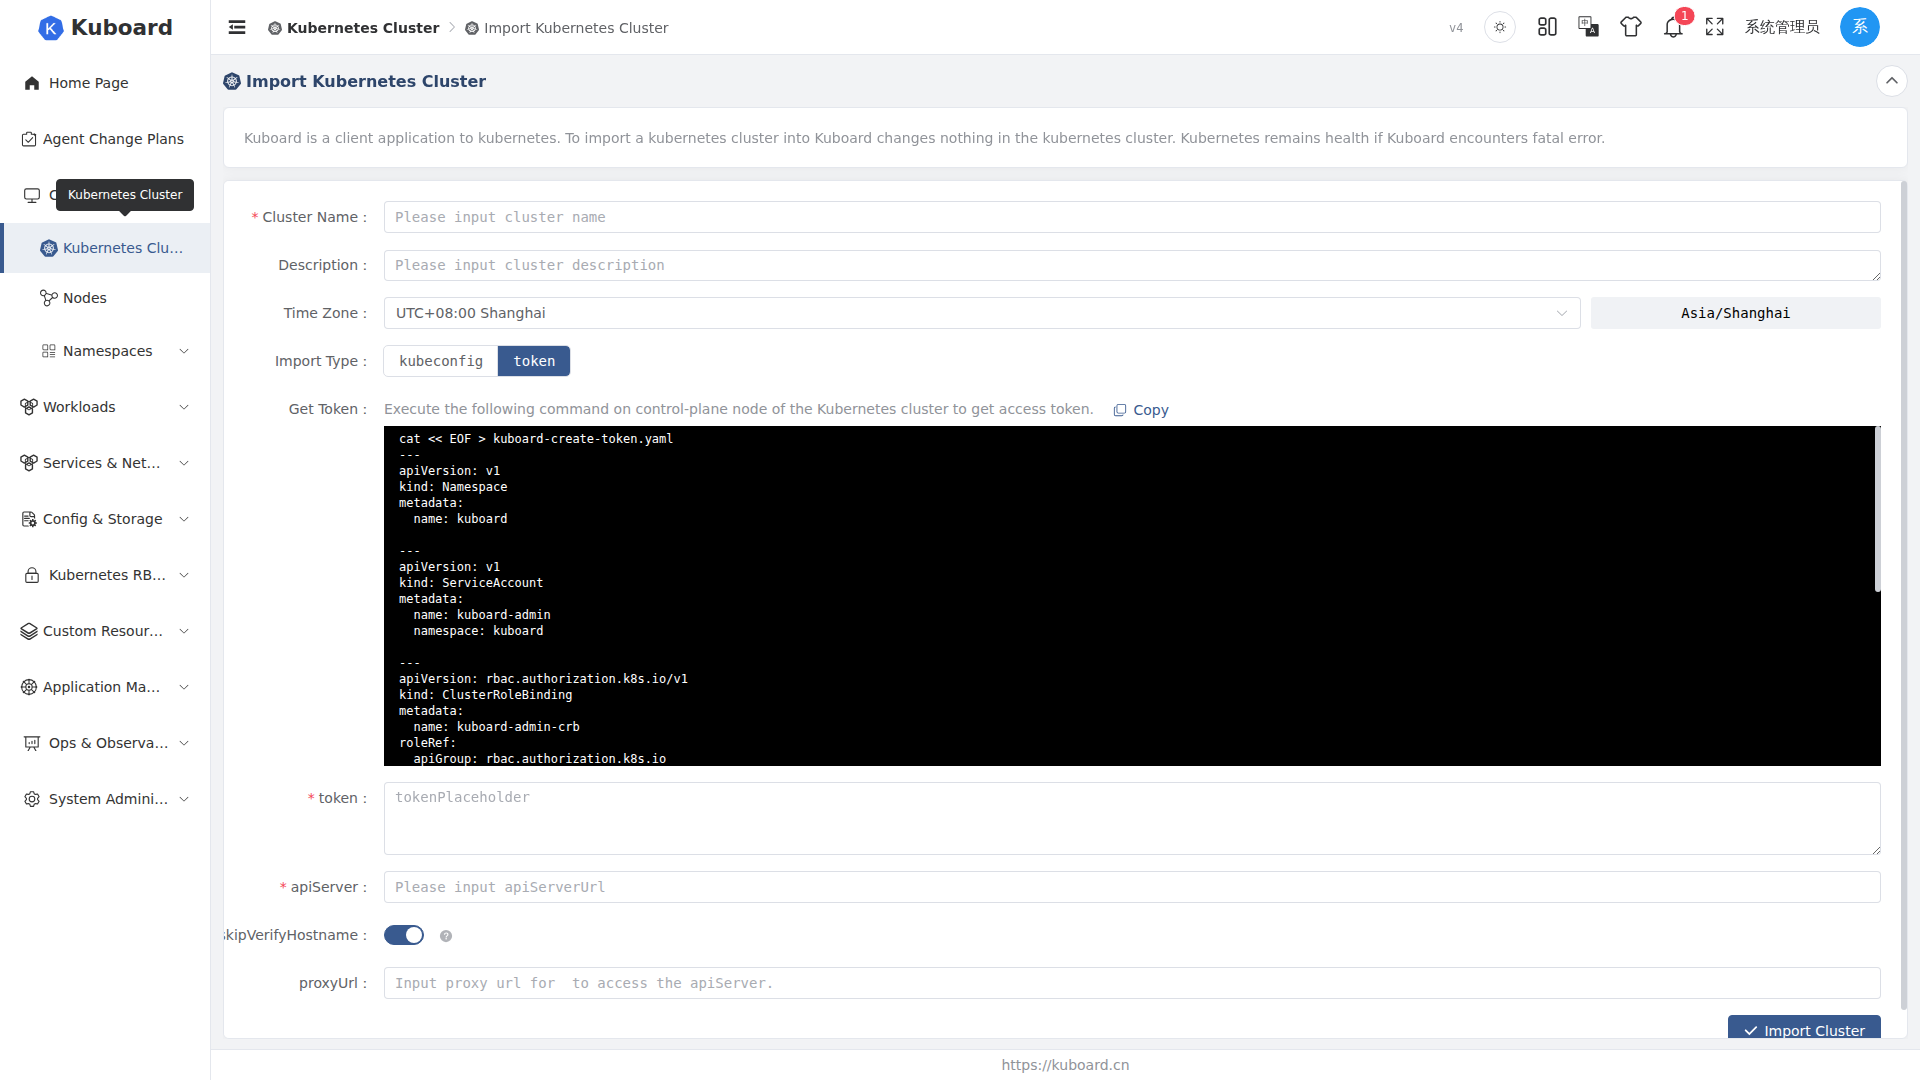
| Field | Corresponding spec field | Description |
|---|---|---|
| Get Token | — | Shows the script above, with a one-click copy button |
| token | spec.importSecretInfo | Required; paste the token printed by the script |
| apiServer | spec.apiServerUrl | Required; enter the apiServer address |
| Skip Hostname Verification | spec.apiServerSkipVerifyHostname | Toggle; see "Connection Options" below |
| proxyUrl | spec.proxyUrl | Proxy address; see "Connection Options" below |
kubectl environment required
Running the script above requires kubectl to be installed on the target cluster's control plane node and configured to access the cluster. If the cluster's apiServer does not use the default 6443 port, adjust the port in the script and the apiServer address accordingly.
Connection Options
Both methods share the following connection-related options:
| Option | Description |
|---|---|
| apiServer address validation | Required; must start with http:// or https://; must include a port number (e.g. https://10.95.15.32:8443); must not end with / |
| Skip hostname verification (skipVerifyHostname) | When the hostname in the apiServer certificate does not match the entered address (for example the error Certificate for 10.99.15.32 doesn't match any of the subject alternative names), check this option to skip certificate hostname verification |
| proxyUrl | Enter a proxy address when the Kuboard server needs a proxy service to reach the apiServer; the server uses the proxy for its connection to the apiServer (user name and password can be embedded in the proxy address, e.g. http://user:pass@proxy:8080) |
The Cluster Object Model in Kuboard
An imported cluster is represented in Kuboard as a Kubernetes-style object (Cluster) with apiVersion cluster.kuboard.cn/v4. Its spec / status structure is as follows:
{
  "apiVersion": "cluster.kuboard.cn/v4",
  "kind": "Cluster",
  "metadata": {
    "name": "production-cluster",
    "uid": "cluster-abc123",
    "createTime": "2026-03-31T21:15:50.285+08:00",
    "updateTime": "2026-03-31T21:15:50.285+08:00"
  },
  "spec": {
    "description": "Production Kubernetes cluster",
    "importType": "kubeconfig",
    "importSecretInfo": "{\"certificateAuthorityData\":\"...\",\"clientCertificateData\":\"...\",\"clientKeyData\":\"...\"}",
    "apiServerUrl": "https://10.95.15.32:8443",
    "apiServerSkipVerifyHostname": true,
    "proxyUrl": "",
    "timeZone": "Asia/Shanghai"
  },
  "status": {
    "importStatus": "success",
    "status": "ready",
    "k8sVersion": { "gitVersion": "v1.29.6" },
    "cacheLastUpdateTime": "2026-03-31T22:00:00.000+08:00",
    "healthStatusReason": "ok",
    "healthStatusLastCheckTime": "2026-03-31T22:00:00.000+08:00"
  }
}
spec fields
| Field | Required | Description |
|---|---|---|
importType | Yes | Import method, either kubeconfig or token |
importSecretInfo | Yes | Import credentials. In the token method it is the token itself; in the kubeconfig method it is a JSON string containing certificateAuthorityData, clientCertificateData, clientKeyData (and optionally token) |
apiServerUrl | Yes | apiServer address |
apiServerSkipVerifyHostname | Yes | Whether to skip certificate hostname verification |
description | No | Cluster description |
proxyUrl | No | Proxy address |
timeZone | No | Time zone of the cluster; defaults to the server-side default time zone when absent |
status fields
| Field | Description |
|---|---|
importStatus | Import status: importing / success / failed |
status | Health status: ready / error / unknown |
k8sVersion | Version information cached from the apiServer /version endpoint |
healthStatusReason | Reason for connection loss (error message when the health check fails) |
healthStatusLastCheckTime | Time of the most recent health check |
cacheLastUpdateTime | Time of the most recent data synchronization |
synchronizeStatus | List of synchronization task statuses (shown on the cluster detail page) |
For security reasons, the credentials in importSecretInfo are not returned to the frontend through the list / detail endpoints.
Import Flow
After clicking the Import Cluster button, the system validates the submitted connection information, submits the import, and then runs an initial data synchronization and health check on the cluster:
- Connectivity check: validates that the apiServer address and credentials are usable; a failed check aborts the import and shows the error reason;
- Submit the import: once the check passes, the cluster record is written;
- Initial synchronization: the system starts synchronizing the data of every resource in the cluster;
- Health check: during synchronization, connectivity is probed continuously; on failure the cluster is marked as
erroron the list page with the connection-loss reason; - After a successful import, you are taken to the cluster detail page automatically.
To double-check the information before importing, see Editing a Cluster; for the synchronization and health-check cadence, see Synchronization Status.
Status After Import
Once the import completes, two dimensions of status can be seen on the cluster list page:
| Status | Value | Meaning |
|---|---|---|
| Import status (importStatus) | importing | The first full synchronization is running |
success | The full synchronization succeeded and cluster data is available | |
failed | The full synchronization failed (e.g. invalid credentials, insufficient RBAC permissions) | |
| Cluster status (status) | ready | /healthz returns ok, the cluster is healthy |
error | The health check failed; hover to see the reason for the connection loss | |
unknown | The first health check has not completed yet |
After a successful import you can browse the cluster's workloads, configuration and storage, services and networking resources in Kuboard. For example, to create a Deployment see Deploying Workloads.
Common Validation Failure Reasons
| Symptom | Cause | Resolution |
|---|---|---|
"Error parsing YAML" or must contain the clusters, contexts, users fields | The pasted kubeconfig content is incomplete or the format is corrupted | Re-run cat /etc/kubernetes/admin.conf and paste the complete content |
Certificate for xxx doesn't match any of the subject alternative names | The hostname in the apiServer certificate does not match the entered address | Check "Skip Hostname Verification", or access it using the domain issued in the certificate |
Error Cannot get K8S version | The server cannot reach the apiServer, or the address / port / protocol is wrong | Check network connectivity, that the apiServer address starts with http(s):// and includes a port, and the firewall and load balancer configuration |
| apiServer address format validation failed | No port number, ends with /, or does not start with http:// / https:// | Modify the address according to the validation rules, e.g. https://10.95.15.32:8443 |
certificate-authority-data is invalid / client-key-data is invalid | The kubeconfig is missing or has corrupted CA / client certificate data | Make sure the complete kubeconfig was copied and the correct context is selected |
| Token method validation failed (401 / Forbidden) | The token is invalid, has expired, or has insufficient permissions | Re-run the script that obtains the token; it is recommended to use a token bound to the cluster-admin role |
Cluster status stays error for a long time | The apiServer is unreachable, credentials are invalid, or the certificate is abnormal | Hover over the status label on the list page to see the "connection-loss reason" (healthStatusReason) and fix it accordingly |